The Worlds 10 Most Mysterious Photos Ever Taken
Very Interesting….
view 0 comments


Welcome to Michael’s blog. Michael Andrew, (aka Michael The Maven) is a freelance
producer, photography instructor, tech innovator, and when needed, disaster aid
specialist. Disclaimer: Michael is a participant in Bhphoto & Amazon affiliate programs
that provides an advertising commission if you purchase through links on this website.

Very Interesting….
UPDATE: I have a limited number of NEW Maven Adapters, a few grey and a few black, they are already starting to go. Please post a comment with your email address below if you are interested and I will contact you directly. Thanks!
Ladies and Gentlemen, I am pleased to announce in very limited quantities, the NEW Maven Adapter – Heavy Duty my first actual product made on my 3D printer.
To get your NEW Maven Adapter please click here. 
 I am always sure to attach a secondary tether to the strap of the camera. In the unlikely event the shoe, ballhead or adapter breaks, the tether should be strong enough to catch your gear. This is a Canon 6D with a Canon 24-70 2.8L Lens.
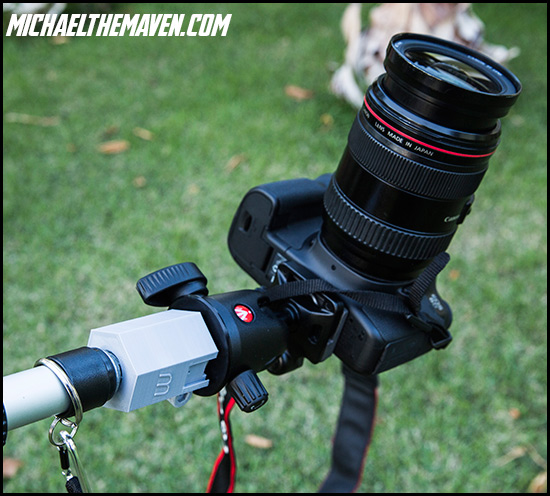
 Something I have engineered into this accessory is it will also accept either 2 Canon Speedlites, 2 Nikon Speedlites, a flash with pocket wizard, as well as 1 Go Pro. While I have locking pin holes in the right places for the Speedlte shoes, I am less confident about their strength, but if you are careful they should be fine.
  One of the very, very first products I ever sold was instructions on how to mount your DSLR camera onto a window cleaner’s pole in to order to get way above your subjects. The Maven Adapter, for about the same price as the instructions alone will be available in very limited quantities. Lets put it this way, I have 3 right now that are ready to be shipped, and will even throw in the washers and bolt you will need to make it work. Would be very interested in getting feed back from those who use these first few copies.
With a little bit of tinkering, I have strengthened my Maven Adapter to be 2.5 times stronger than the original version. Im confident the pole, ball head or shoe will break before the actual adapter will.
You will need to buy a ball head if you do not already have one:Bogen 486RC2 Ball Head. You will also need to pick up a pole at any local hardware store, the good ones usually cost about $40-50. Its a minimal investment to be able to get your camera 10-20′ in the air. If you have an assistant and a Canon 6D you will be able to take absolute full advantage of that Wifi feature to see, focus, and shoot wirelessly! Thats awesome!
The Adapter is not yet listed on the store, but if you are interested in getting one, they will be $40 plus shipping. Just email me, or write comments below- that you are interested and Ill send you instructions on how to order. I have a few more improvements I would like to make, I think I am going to make one side Canon, the other side Nikon for the Speedlites and improve the Go Pro mount, more to come!
While many of you may feel this doesn’t apply to you…trust me, I believe that most of the general public will slowly come to the realization that 3D printers are not only super cool & affordable, you would be crazy not to have one. With just a little creativity, you can turn it into a business of some kind.
Ive already been flooded with tons of questions about 3D Printing, the most common is Which Software is best for beginners?. I started out studying Blender, but I will be honest with you, it had a very steep learning curve and there were many things I couldn’t figure out how to do.
Reading other boards, I learned about a browser based program called Tinkercad and I kid you not, it took about 20 minutes to learn and it is extremely intuitive. I love that it includes measurements in mm or inches. While there are a few things I do not like about it, these set backs are very minor and I would say that most children should be able to use Tinkercad no problem. It almost eliminates the learning curve so you can get right into design.
Ill be showing you guys what I made over the weekend and is an extremely useful tool in any photographers tool bag. You can see the latest design of it in he second picture. 
 If you are just getting into 3D Printing and Design, Tinkercad is an absolute must check out!
PS- It was not so easy to figure out how to create 3D text using fonts in Photoshop, but I think I have the workflow worked out. Ill share with you soon!
This video was suggested to me by a viewer who saw my unboxing video. Pretty amazing!
I really hope that I can learn as much as I can about 3D printing as fast as possible because I would like to have an impact with it on a level of what this video demonstrates, which to me is incredible. I feel driven in regards to it and it feels right.
Spent all day Saturday working with it & all feels very natural. It is GREAT fun and Im excited to apply some of what I learn towards photography gear. I should have some interesting things to show you guys soon.
Here is my unboxing and set up:
The first 2-3 days I was printing with this thing like crazy, Im finally starting to calm down a little and get more into the software design. Thingiverse has a lot of really cool stuff, from Go Pro Mounts, to Art, and to think this is just the beginning.
I was studying a 3D Program called “Blender“, but today I found a super simple online program calledTinkercad, which is so easy to use it is ridiculous. Blender, while free, has a learning curve that I do not think the average person is going to want to get through. There are a number of other creative ways to design in 3D and Ill be sharing these as I learn more about them.
